How to set up a class mailing list
1) Make sure you are logged into your google apps account and are at the 'mail' screen. Click compose and start to type the names of students in the class in the 'to' field - you can use last names or first names - it should auto complete as the students are in the system, if the correct name pops up, click on it and move onto the next. When you have the complete list send the email - name it test, or just say hello. This is a funny way to do it, but with out sending them an email first, the boys will not be in your 'address book' - don't ask me why, its an admin issue?!
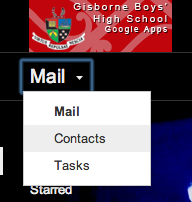
 2) Now....navigate to contacts by clicking on the 'Mail' button on the top left of the screen - in the drop down menu 'contacts will be one of the options.
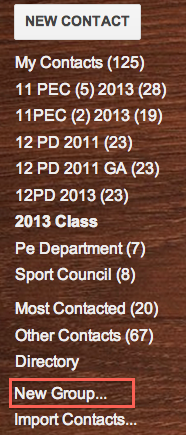
 2) Set up a new group of contacts by hovering over your contacts on the left of the page and at the bottom there is an option to create 'New group....'. Name your group and it will be set up on the left of the page, click on it.
 3) Your new group will be empty and you need to add your students, click on the button that has a plus and a person on it - a box will appear and allow you to type names. They should auto complete and by pressing the cursor or enter button you can enter more. When you have the full list - click 'Add'.
4) Your new group will now appear in all google apps, when you are sharing forms, documents or calendar invitations the group will show up when you start to type it (the name of the group) in the 'to' field of the application you are using.
To send mail to contact group;
1) Compose a message from your gmail apps account and in the 'to' field start writing the name of the group, all the names should appear - you can add and remove names from the list by highlighting and deleting them.
2) You can also send mail from within the contact manager by selecting a group, selecting which names you want to send to, and then clicking the envelope button!
This is an easy but essential task if you are planning on doing any e-learning with your classes.
1) Make sure you are logged into your google apps account and are at the 'mail' screen. Click compose and start to type the names of students in the class in the 'to' field - you can use last names or first names - it should auto complete as the students are in the system, if the correct name pops up, click on it and move onto the next. When you have the complete list send the email - name it test, or just say hello. This is a funny way to do it, but with out sending them an email first, the boys will not be in your 'address book' - don't ask me why, its an admin issue?!
 2) Now....navigate to contacts by clicking on the 'Mail' button on the top left of the screen - in the drop down menu 'contacts will be one of the options.
  2) Set up a new group of contacts by hovering over your contacts on the left of the page and at the bottom there is an option to create 'New group....'. Name your group and it will be set up on the left of the page, click on it.
 3) Your new group will be empty and you need to add your students, click on the button that has a plus and a person on it - a box will appear and allow you to type names. They should auto complete and by pressing the cursor or enter button you can enter more. When you have the full list - click 'Add'.
4) Your new group will now appear in all google apps, when you are sharing forms, documents or calendar invitations the group will show up when you start to type it (the name of the group) in the 'to' field of the application you are using.
To send mail to contact group;
1) Compose a message from your gmail apps account and in the 'to' field start writing the name of the group, all the names should appear - you can add and remove names from the list by highlighting and deleting them.
2) You can also send mail from within the contact manager by selecting a group, selecting which names you want to send to, and then clicking the envelope button!


Comments
Post a Comment